

Whether you are new to data and information visualization or have been using visualization tools and techniques for a long time, there is always something new to learn. Here are short web tutorials that we think will help get you started .
Have an idea for a tutorial?
Suggest a tutorial topic »
Good Perspective: How to Take Effective Site Photography
page: 1 | 2 | 3 | 4 | 5 | 6 | 7
Onsite Procedures
The following steps are designed to help you be efficient with your time onsite, and increase the likelihood of acquiring as many useful images as possible.
- Scout locations: Identity several locations that offer unobstructed views of the area and/or subjects you wish to shoot.
- Be sure the locations are (and will remain) safe.
- That each location offers good frontal illumination of your intended subject.
- That shots from each location will benefit your project. While scouting, it can be useful to record the important points and rationale for each shot to help you appropriately frame each shot before shooting.
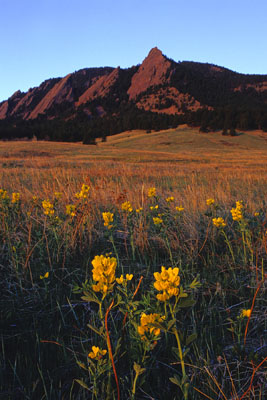
This photo is attractive from a visual standpoint, but the purpose of the shoot was photo documentation of these mountains for rescue training. The flowers in the foreground and early morning lighting do not benefit the photo for that purpose.
- At each location:
- Once again confirm the safety of your location and situation.
- Attach the camera to the tripod.
- Adjust the tripod legs so that the camera is horizontally level.
- Shoot wide-angle and be sure everything that needs to be captured is in the frame, with plenty of buffer space. Images can always be cropped if necessary, but missing imagery can't be added.
- Be sure that nothing undesirable is in the frame, for example billboards or power lines.
- Focus on the most important feature in the frame by zooming all the way in to the feature, focusing on it, then zooming back to your desired zoom level. This is the most accurate way to focus.
- Shooting:
- Use the shutter release (if available) or smoothly and carefully depress the camera's shutter release. Any shake may result in a less clear image.
- Take several shots from slightly different positions: Its much better to have too many shots than not enough. If the view includes moving people or automobiles, take shots at staggered intervals and be sure you've captured everything important clear and unobstructed.
- Take reference photos to help you better understand each location during post production.
- Take any necessary close up photos of items that are of importance. This will allow you to digitally enhance any items that are essential for the success of the photo later if necessary.
- Before leaving the site:
- Obtain any necessary release form signatures that may be required from anyone photographed.
- Review your photos on a laptop or in the camera's image window to be sure there are no problems.
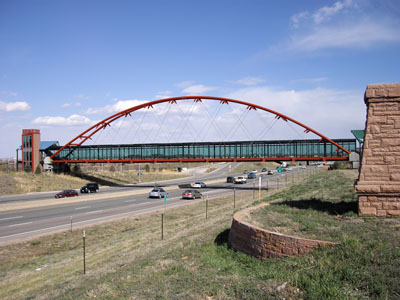
This photo appears to be fine at first, but the stone column on the right obstructs the bridge entrance which should have been captured in the image.